BLoC is an architectural pattern for Flutter, but what is an architectural pattern? Let me explain everything in a nutshell.
What is an architectural pattern
Let’s start by asking this question: what is a pattern? In software development, an architectural pattern defines the connection between classes and how the data should interact with the different roles. In a nutshell, creating a pattern is like drawing some dots and joining them with lines to define the data flow from source to user.
Popular patterns are MVC (Model View Controller), MVP (Model View Presenter), MVVM (Model View ViewModel). All these define the interaction and flow of data from point A to point B.
In 2018, at the I/O, Google talked for the first time about a new pattern they created for Flutter, the BLoC pattern, and since then it’s the golden standard for the majority of Flutter developers.
BLoC stands for Business Logic Component and its goal is to facilitate the management of state, decoupling logic from presentation (views).
NOTE: State is data needed to rebuild the UI at any moment in time. When the state of the app changes, for example the user presses a button, that triggers a redraw of the UI.
Why we need a development pattern
Using a pattern is not mandatory, an app can be made without using them but that can bring problems in future stages of the project. If you’re developing a small project, an app with a couple of pages, you may not use them; but if you have a bigger project, or rather a project that will scale up over time, a pattern could eliminate headaches thanks to responsibilities separation and a clear data flow.
If you find yourself working on a big one, which has no pattern or uses a very chaotic one, you could end up destroying the functioning of the app because touching the smallest piece of code can turn into the explosion of another piece of functionality due to spider web-like data flow.
To avoid these kind of situations, we introduce responsibilities separation which is at the core of development patterns. Separating responsibilities between classes means that you create compartments that have only one job, for example:
- ui class – the user interface class
- business logic class – a class that takes inputs (events) from UI and either processes it or forwards the event
- network class – it’s only task is to handle api calls and pass data to who requested it
In a nutshell, in the BLoC pattern, instead of having everything cluttered in one place it would look like this:
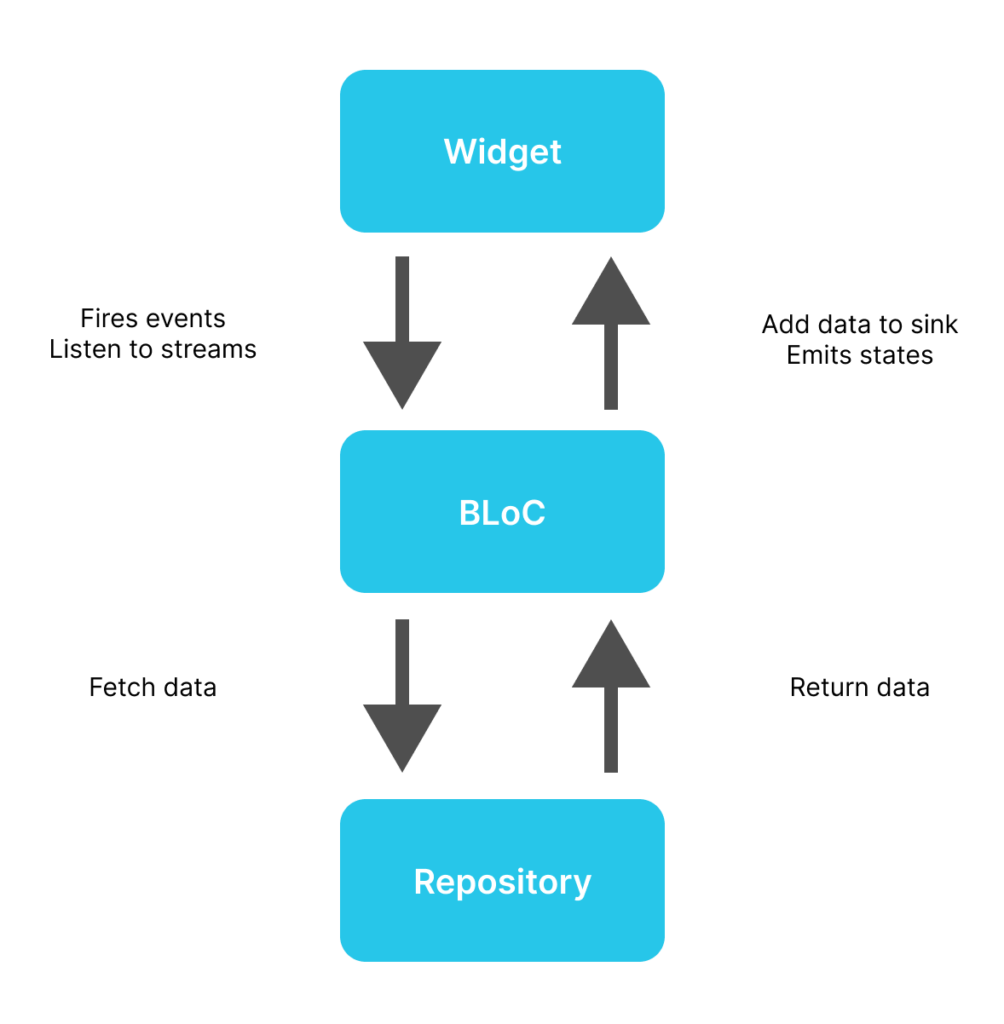
- User presses the refresh button, User Interface fires an event
- BLoC captures the event and asks for data from Repository
- Repository downloads the data and returns it to the BLoC
- BLoC elaborates the data (if needed) and adds it to the sink
- User Interface listens to the stream and displays new data when it arrives
Deep dive in BLoC pattern
The BLoC needs a way to communicate with the User Interface so Streams were created for that. Let’s have a look at the BLoC diagram:
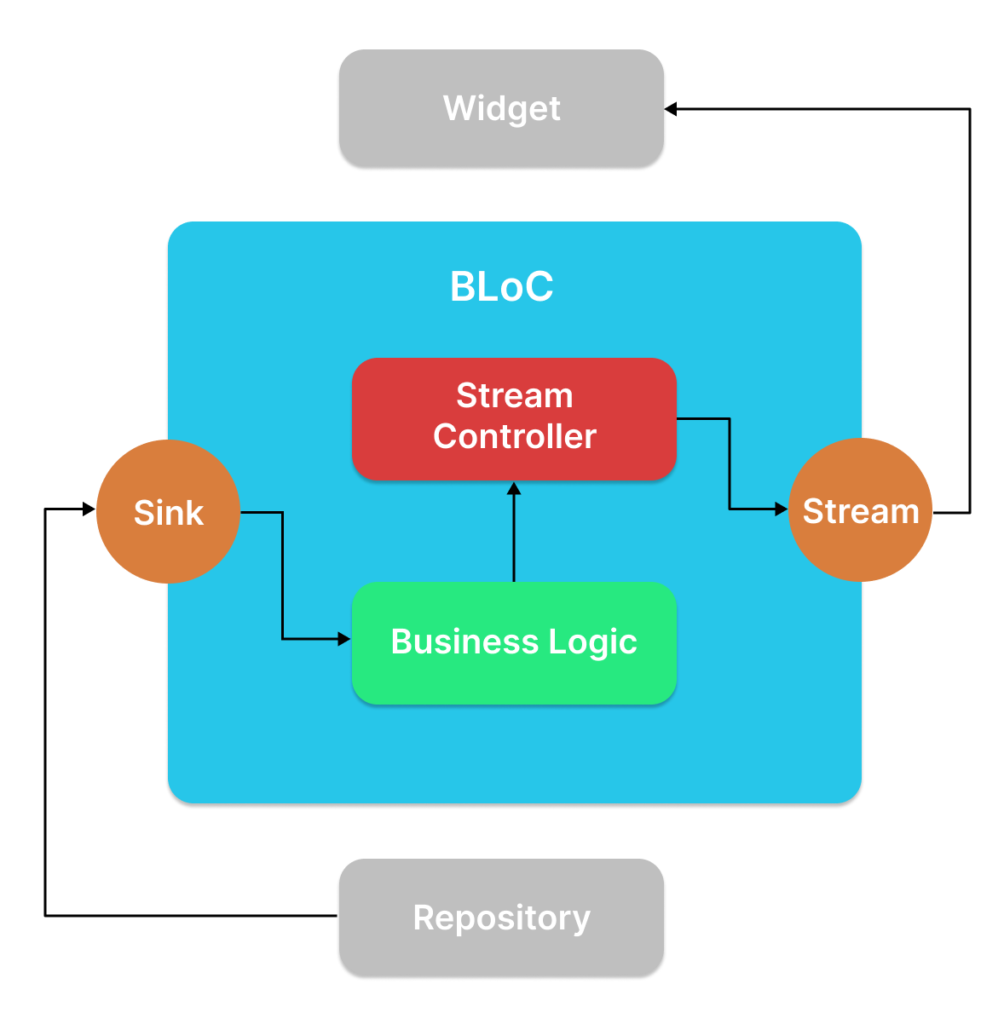
The BLoC is made of a StreamController (with a Sink, and a Stream inside it) and the Business Logic.
Let’s define them in order.
Stream Controller
The StreamController contains the sink and the stream and controls the sending of data to the widget. The data is added to its sink and reaches the widget via the stream.
final streamController = StreamController();         // 1

void refreshData() async {
	final result = await repository.refreshData();   // 2
	streamController.sink.add(result);               // 3
}- Create a stream controller inside the BLoC
- Fetch for data from repository
- Add the data to the stream
Important: when initialising a stream controller, only one listener can subscribe to the stream and wait for the data. If you need multiple subscribers, use the broadcast constructor instead.
final streamController = StreamController.broadcast();Business Logic
The business logic is where you perform logic on the data after arriving from the repository. Let’s say we need to separate components of the data in a list format, the above code would become:
final streamController = StreamController();         // 1

void refreshData() async {
	final result = await repository.refreshData();   // 2
	final dataList = result.split(',');              // 3

	streamController.sink.add(dataList);             // 4
}
Line 3 is our business logic, but of course it could be anything.
Ok but where is the Stream?
As we mentioned, the stream is the part which delivers data to the widget so we will not use that in the BLoC class, it’s only found inside the Widget class.
How to listen for data
So the data arrives from the repository, passes through the BLoC and finally arrives to the widget through the Stream. To do that we have to wrap our widget with the StreamBuilder:
StreamBuilder(                                  // 1
	stream: bloc.streamController.stream,       // 2
	builder: (context, snapshot) {              // 3
		if (snapshot.hasData) {                 // 4
			return Text(snapshot.data);
		} else {
			return CircularProgressIndicator();
		}
	},
);- Wrap your widget with the StreamController
- Specify the stream to listen
- Create your UI inside the builder function
The builder function gives you access to the data snapshot. It’s just an object containing the incoming data and some handy functions like the one to check if the stream has data when it launches. The first time the UI builds, it will check if the stream has data inside, if it doesn’t it will show a circular progress indicator and after the bloc sinks the first peace of data, it will arrive in the stream and the stream builder will render the UI with the data.
Every time the bloc will sink a new peace of data, the UI will render again displaying the newly arrived content.
If you need some initial data to be displayed before the fetched one arrives, you can add the initialData attribute to the stream builder:
StreamBuilder(
  stream: bloc.streamController.stream,
  initialData: bloc.placeholder,
  builder: (context, snapshot) => Text(snapshot.data),
);
Important: stream controllers have to be closed manually since it’s not automatically handled when, let’s say, the user goes back in the navigation stack. To manually close it, we need to know when the stateful widget is going to be erased permanently from the widgets tree, so we use it’s method dispose(). Since the stream controller is inside the bloc class, a way of doing this is:
class MyWidget extends StatefulWidget {
	...

	@override
	void dispose() {
		bloc.closeStream();
		super.dispose();
	}
}

class MyBloc {
	final streamController = StreamController();

	...

	void closeStream() {
		streamController.close();
	}
}
Self implementation vs Package
Sometimes, implementing the bloc pattern for a large application can result in a fair amount of boiler plate code. If you want to remove all of that, a package called flutter_bloc comes to your rescue. This package contains both fundamental code for the correct functioning of the streams and Widgets like BlocProvider, BlocConsumer etc. for widget level implementation. It allows you to easily handle events and states throughout the application.
For those of you wanting to explore a more advanced version of this architectural pattern, take a look at the package here:
Conclusion
Choosing a pattern is no easy job. There are plenty of them, suited for different projects and different code writing styles. If you’re not 100% convinced of what pattern suits you, explore combining them in a new way that could become your favourite way of building applications. I’m currently using a combined version of Clean Architecture and BLoC for a big and scalable project. Clean architecture help with role separation throughout the code and BLoC for the state and events management at the presentation layer (where the views are).
The world of architectures is very broad, so explore it!
